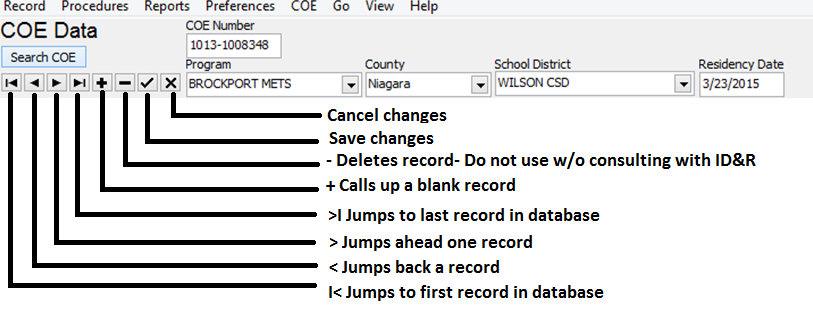
COE View and Data Panel
Section One
Overview
Children are eligible to receive MEP services if they meet the
definition of “migratory child” and if the basis for their eligibility
is properly recorded on a certificate of eligibility (COE) or other
written or electronic form. In this manual the paper copy or electronic copy of the COE
that is filled out by the recruiter will be referred to as the
“certificate.”
When a COE certificate is received by the local METS it should be
added to the local MIS2000 system. Before entering the information from a COE certificate, Data Specialists do a Student Search under
the Student View to see if the students are already on the local or
state database. To learn how to do this go to Student View/Search Student.
Important: When COE information has been added or updated the local METS database must be uploaded daily to the state server.
Our current paper COE certificates have room for three student listings. Some families have more than three students. In those cases the recruiter fill out as many COEs as necessary with all the required fields including parent's signature on all COEs. The Data Specialist will enter all COEs to completion into the system. Example: A family with 6 students moved to your area. The recruiter will fill out 2 COEs with all the required information. The Data Specialist will enter both COEs (number and required data fields) separately into the system. You can add a note on Directions about having 2 COEs for that family.
Step One.
Open MIS2000 and go to the COE View as shown below

Keep the CAPS LOCK key on at all times when using MIS2000. All data must be entered in capital letters.
Use the TAB key to move from field to field when moving sequentially over the screen. Use the mouse pointer to jump to a field to edit.
Here's a graphic to show what the symbols below the Search COE button mean.

There are some powerful buttons here. The Delete Button on the COE Data panel (the – minus sign) should not be used without consulting with the state ID&R office.
Information that you have entered is saved any time that you leave a screen or exit the program even though you have not clicked on the Check button.
COE Data Panel
Includes the fields COE Number – Approved on the top portion of the screen of every COE screen.

On the COE data screen left click on the + sign, which is the
“insert record “ key.
Enter the COE number in the COE number field and hit the TAB key to advance to the next field, the Program Name.
In the Program Name field you should choose or type your local METS. Then hit the TAB key to move to the next field, County.
The County field please choose or type the official county of the school district.
Hit TAB to move to the next field, School District.
School District field Choose or type the School District name. Please note the School District name is usually different than the Facility Name (building).
Residency Date is given by the Recruiter, it is the date in which the student moved to the area
The Approved field is State controlled. You will not be able to enter anything into this field on a machine at a local METS. The Approved field will have a date in it when sufficient documentation has reached the state ID&R office and has been approved for funding.
